Heads up, long post!!
This last week I’ve been working on some minor improvements to motion detection, as well as a new (though only slightly different) motion detection algorithm. I decided to post my developments here rather than on Gitter.im, where they are hopefully easier to reference and locate for future travelers to this topic.
First, a bit of background in my frustrations with motion-detection (MD). I have about 7 cameras surrounding a rental property of mine (which is currently vacant). Adjacent to my property is a tow/salvage car lot, and an auto-repair shop. In December, I decided to upgrade a number of my old analog cameras to IP cameras, and junked my 8-channel DVR, and committed to moving everything over to Bluecherry. I’ve been “evaluating” Bluecherry for the better part of the last year (or more?), but it was limited to 2 or 3 cameras that weren’t covering critical areas.
In switching over, I spent considerable effort tweaking the MD settings, and had pretty reliable detection of “legitimate” events, but was also regularly getting “errant” events (5-10/day/camera) from auto-exposure changes, IR-cut switching (day-night transitions), as well as events from insects flying near the cameras. If I tried to tune these edge-cases out, I would eventually lose the ability to detect anything but the most significant of events (like someone covering or moving the camera). Even then, I’d still typically get motion events from the IR-cut switch. As a result, I switched off all my motion detection, and opted for continuous recording instead.
A few weeks ago, the car lot behind me was the subject of repeated thefts of catalytic converters, both from the storage lot, as well as the mechanic’s shop. 3 nights in a row, the thief would enter into the lot around 2am, remove 2-3 catalytic converters over the next 4-5 hours, and pack up and leave before 7am the next day. Every night, they entered and left through my yard, even driving their vehicle onto my property to load up (though they removed both their license plates, etc). I was glad that I didn’t have tenants at the time, though if I had, they probably would not have used my yard. It took me 2 more days to notice what had happened.
Fortunately, after talking with the shop owner, and identifying the area of entry, I was able to go back and review my footage and found lots of usable footage to aid the shop owner. But, ultimately, I was frustrated that I didn’t have reliable motion events that would provide me with timely notification of the burglary in-progress. With that, I’ve taken to digging into the code to see if I can make some improvements…
After getting in, and twiddling some bits for a few days, I was able to get something that works pretty well. I’m in the process of putting together a PR, and hopefully we can get it incorporated into v3. But, I still have a bit more work to do (mostly on making it configurable)!
First, a quick primer on how the existing motion algorithms work (A subject I’ve been curious about for some time). I haven’t delved deeply into the code of the “Default” algorithm (yet), but most of the principals are the same between the two options. The “Experimental” mode uses OpenCV to handle the primary math/image processing.
Just to set the record straight, most motion detection is done using grayscale images. One of the very first orders of business in motion processing is to remove all color. This reduces memory needed, and simplifies the various math operations. This ultimately leads to much better performance when compared to processing on color images. But also, motion has no bearing on color… so, its just not necessary.
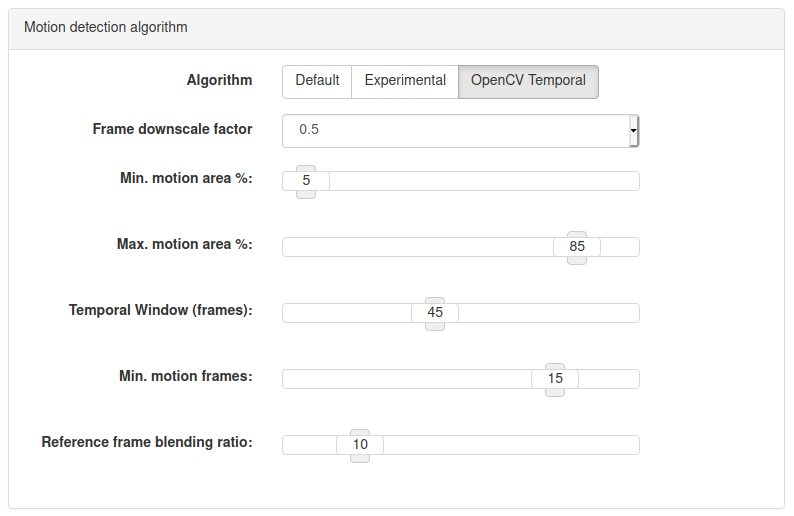
The common option between both modes is the “Frame downscale factor”. This is simply an effort to resize the original image from the camera into a smaller resolution before further processing. This can have a significant impact on performance, particularly with high mega-pixel cameras. But, be careful… down-scaling too far will result in lost detail (and thus the ability to detect motion in that detail).
The next step of the process is to apply a Gaussian blur to the newly scaled image. This tends to soften and reduce noise and natural variance between frames of video that would otherwise cause a false trigger (truly, no two frames of video are the identical). This blurring also reduces detail, and blurring too much has a similar net effect as down-scaling too much. Performing this operation on a large (>2MP) image can be very costly, and so it makes sense to do this after the down-scaling. Within Bluecherry, the amount of blurring is not configurable, and in the code, this is done with a fixed size kernel, which results in more apparent blurring (and more detail lost) with smaller images, more so than larger images. In short, if you down-scale too much, you’re getting penalized twice - once for the down-scale, and again for the blurring. I’ll try and following up on this original post with some pointers to get the most out of motion-detection, and what should be considered good values to use.
Next, the image is ran through a subtraction process, in which a previously recorded “reference frame” is subtracted/removed from the current frame. Th result is an image where the black pixels are “no change” while the brighter pixels represent “more change”. If the pixels of a black asphalt driveway are suddenly replaced with the white pixels of a blinding headlight… this is considered motion, as the difference is black and white, literally. This resulting image is often referred to as the Delta Frame.
After subtracting the two frames, the Sensitivity settings of the “motion map” come into play. This is the 32x24 grid in Bluecherry that you can color in with “None”, “Minimal”, “Low”, “Average”, “High” and “Very High”. This is used in a “threshold” process that aims to convert the gray-scale delta frame, into a binary image (true Black and White). If the pixel value of the delta frame exceeds the threshold value of the map, then the pixel is turned from a gray value, to white, otherwise black.
This new image is typically a lot (Dozens? Hundreds?) of white splatters on a black canvas. At this point, we have an image which, if overlayed with our original image, would show us where motion was detected – but it would likely be illustrating a number of small points and edges. If our delta frame was derived from one image with a person, and the other without, we’d have an image of a white silhouette of that person. But people don’t magically appear, rather they slowly (relatively speaking) move across the frame, from one place to the next. If our “reference frame” is simply the frame before our current frame, we would see only an outline, an edge, as the person moved in-to and out-of the pixels surrounding them in the previous frame.
Lots of things cause motion: Small animals, birds, insects, even spiders making webs over the camera lens. Perhaps counter-intuitively, but obviously, Motion Detection works better the faster an object moves, rather than the larger an object is. Size helps too, as it impacts more pixels, but if the motion is slow enough our delta will show only a few pixels changed, whereas even a small object moving fast (especially with a slower shutter speed) will result in a large change in the delta (because the fast moving object appears to streak across the frame). A moth which may only be a few pixels, swooping across the frame, can trigger hundreds, if not thousands of pixels, where a car which is thousands of pixels, may only trigger hundreds of pixels if its slowly driving across the pavement.
Moving on… Now that we have this black-and-white image of “areas of motion”, we need to try and determine “how much has moved”. In its most basic form, this is just counting white pixels. But, if there is rain, snow, or just a lot of bugs, we’ll have lots and lots of motion spread out across the entire frame. We need to try and determine if all our motion pixels are from one object, or many. We usually do this by proximity. If all the pixels are close to each other, its probably the same object. If not, its probably a bunch of smaller, individual objects. A (relatively) easy way to determine this is to “grow” the size of the pixels, by a few pixels in each direction. If these pixels are near other pixels, they will overlap, and turn into one big “blob” of pixels. If not, we just have a single smaller blob. After we grow the pixels, we use another algorithm that tries to determine the shape of all the blobs in the image. The result of this process is a list of detected blobs with information about each (such as where, and how big they are).
As a final step in determining whether “motion is detected”, we check the size of each of these blobs to determine if they are large enough to warrant raising a flag. But remember, sometimes, small objects can create large blobs if they are moving fast, and large object can create few blobs if they are moving slow.
This is the final parameter of the “Experimental” settings in Bluecherry; the “Min. motion area”. This basically says, what portion of the image should be detecting motion, at a minimum, in order to trigger a “Motion Event”. If any one of those blobs is larger than this minimum (as a percentage of the frame), than this frame has “motion”.
A quick word about the notion of the “as a percentage” caveat. For most people, a percentage of an area is not overly intuitive. Without posting images, lets try a little experiment: using the “Sensitivity Map” in Bluecherry, and without spending any time to “think about it”, picture 1% of that frame in your mind. How big is it?
Now, take a moment, and count how many squares actually fill up that “1%”. If you’re like most people, you probably guessed between 2 and 4 squares (1x2 or a 2x2 grid). In fact, there are nearly 800 squares on that grid, and so 1% would be nearly 8 squares (approx 2x4 grid). One square is actually closer to 0.1% of the frame than 1%. If you are wanting to detect an area of motion that is smaller than a 2x4 area, you can’t. In my yard, I have a long, narrow driveway that comes to the back of the property, and my camera is mounted up high, with a wide-angle lens. In all but the most extreme cases, a full-grown adult walking through the yard will not fill more than 1% of the frame until they are standing within about 15-20 feet from the camera (on a lot that is 60’x60’). Also, remember that because we are talking about percentages (never mind the scaling and blurring), all the mega-pixels in the world won’t help you!
As a final point of discussion on how MD works, we need to talk about the “reference frame”. Recall that the reference frame is the frame that we subtract away from the current frame, to determine what has changed. In the most basic motion detection algorithms, this is usually the first frame from the camera. In Bluecherry, particularly for the “Experimental” mode, we actually have two reference frames. We perform the above process at least once, and possibly twice - for each reference frame. The first of these reference frames we update every other frame, while the second reference we update every 25 frames. If no motion is detected with first reference frame, then we check again with the second reference frame.
I think this is what makes the “experimental mode” so… experimental. Its an interesting idea, as it tries to accommodate recent (previous frame) changes with not-so-recent (25-frame-old) changes. If the motion pauses for a frame or two, it may fail to trigger motion, since it is close enough to the previous reference frame. However, we have a fall back, by looking backward (potentially up to 25 frames) ago. The likelihood of actual motion failing to trigger against both of these in pretty slim. However, there is a potential oversight – this 25-frame reference frame isn’t always 25 frames old. It just gets updated every 25 frames. This is important because it could have been updated last frame, and is therefore identical to the first reference frame, which is also 1 frame old. Add another 2-3 frames, and its still relatively recent – recent enough that the purpose of the secondary check on the “older” reference frame, isn’t actually that relevant, because its still similar enough to the original that the motion goes undetected. The odds are in its favor, with its relevance being insignificant only for the first few frames after being updated. In most cases, it works really well, but its not perfect (if there is such a thing).
An alternate approach might be to have these two reference frames rolling every n/2 frames (12 in this case), such that there is a guarantee that the difference between the two reference frames is always n/2 frames, and that the difference between the current frame and /at least one of/ those two reference frames is always n/2 frames.
I digress. This isn’t post isn’t so much about the possible flaws of the experimental mode, as much as it is understanding how it works, and identifying ways to improve it.
And that finally brings me here…
I started implementing a 3rd motion detection algorithm. I almost hate to call in a new algorithm, because it borrows heavily from the experimental one. The majority of the process above remains the same, and they actually share a lot of the same code. While I tried to avoid (and could have entirely, if I’d tried harder) making any changes to the behavior of the Experimental code, I felt that the changes I did make were beneficial enough to justify.
These changes are two-fold. The first is simply to reject motion that occurs over the entire frame (or over a very, very large portion of it) – if the motion area fills the entire screen, there is likely something wrong (camera has been covered, IR-cut filter, auto-exposure change) – so, I’ve included a “Max. motion area %” parameter. If motion exceeds this, then discard the motion flag on this frame.
In addition to the Max Motion Area, I’ve also modified behavior so that the motion trigger is calculated from the sum of all contour/motion areas in the frame. Previously, this translated to any single motion area that exceeded the minimum percentage would trigger a motion event. This could lead to a non-trigger event if the motion area was segmented (which typically happens as motion contours tend to surround the thing in motion, not enclose it).
I’m on the fence with this one. Described above, a person walking through frame isn’t identified by them being a single blob in motion, but rather a series of blobs that lead, and more commonly trail, in the direction of motion. So having a single motion area that exceeds 5% (or even 1%) is much less common. However, the sum of those areas could easily exceed 5%, and should cause a trigger. The other side of that proverbial coin is that there is no attempt to localize the area of motion (in part to satisfy Max Motion Area). A flurry of large snow-flakes, as an aggregate, could easily exceed the Min Motion Area, but may not exceed the Max Motion Area, and still trigger a motion event that lasts for hours. I like watching snow fall, but not that much! Obviously, this needs more testing under these circumstances to see if it holds up, but so far the results are encouraging.
The second part of the new algorithm attempts to introduce a more “temporal” aspect to the motion evaluation. It does this in two ways.
The first is by continually updating the reference frame by blending the existing reference with the current frame. Currently this is fixed at a 90/10 ratio, which loosely translates to the reference frame becoming convergent within about 10 frames. This is a pretty common approach to reference frame management in OpenCV-based MD implementations, so this is a pretty confident change. This ratio can be tweaked to fine-tune the speed at which the reference frame converges, but in my testing, changing these didn’t make a significant change in the ability to detect motion. A wider ratio (90/10, or 100/1, etc) resulting in a longer convergence means that a sudden change in the frame (such as a porch light turning on) will report as a motion alarm for longer (~10 frames) before clearing, than would a more balanced ratio (50/50). Conversely, a fast moving object, such as that damned moth that is only visible for 1 or 2 frames, while still possibly triggering motion, will have a minimal adverse affect on the reference frame, rather than possibly replacing the reference frame entire with an “errant” frame that would cause a motion flag for some number of subsequent frames when that object is not longer in frame.
The downside of blending the reference frame is an increase in CPU usage. In my setup, with 7 cameras, I see about 15-18% CPU using the stock Experimental mode. With the blending, the same 7 cameras is now about 32% CPU.
A fair compromise here might be updating the reference frame (via blending) every nth (12th?) frame, and using a more balanced blend (ie 66/33). This would still allow the reference to keep updating gradually, but could potentially reduce the incurred CPU burden by a factor of n (its now doing 1/12th the work).
The second “temporal” change is to track some N number of frames, and record which of those detected motion. If more than X number of those frames contained motion, these trigger the motion alarm.
This change attempts to minimize short-lived, one-off motion events, such as birds flying through frames, cars passing on streets outside, or those pesky moths. Obviously, this isn’t perfect, and every situation requires its own evaluation, so this is definitely an area where the user needs to be able to customize. In my implementation, I’ve added a “Temporal Window” and a “Min Frame Count”. The first is specifying the N number of frames to keep track of, while the latter is the ‘X’ necessary to trigger an alarm. The implementation doesn’t look for consecutive frames flagged, rather only that a certain percentage of frames be flagged in order to trigger the alarm.
These parameters could be (should be?) simplified to a simple “Temporal Sensitivity”, which set’s the ‘X’ to some value - either X frames, X seconds, or even just a conceptual “X” (High, Medium, Low, etc), and N is either a constant, or scales with X (N = X * 3).
This “X/N/Temporal Sensitivity” has the trade-off of fewer random motion events at the cost of an artificial delay in initial motion detection. However, with the pre-motion video buffers, this is a minimal impact (1-2 seconds of required motion with a 5 second pre-motion buffer still give 3-4 seconds of pre-motion video).
At this point, this is still a WIP in progress, but with my testing so far (on my property) its proving to be a significant improvement.
For the community, I’m posting this here for 1) a reference to how motion-detection currently works (at least for Experimental mode), 2) an introduction to some improvements I’m proposing, and 3) community feed-back and discussion regarding the changes to the motion algorithm itself, as well as the various new parameters that it might introduce.
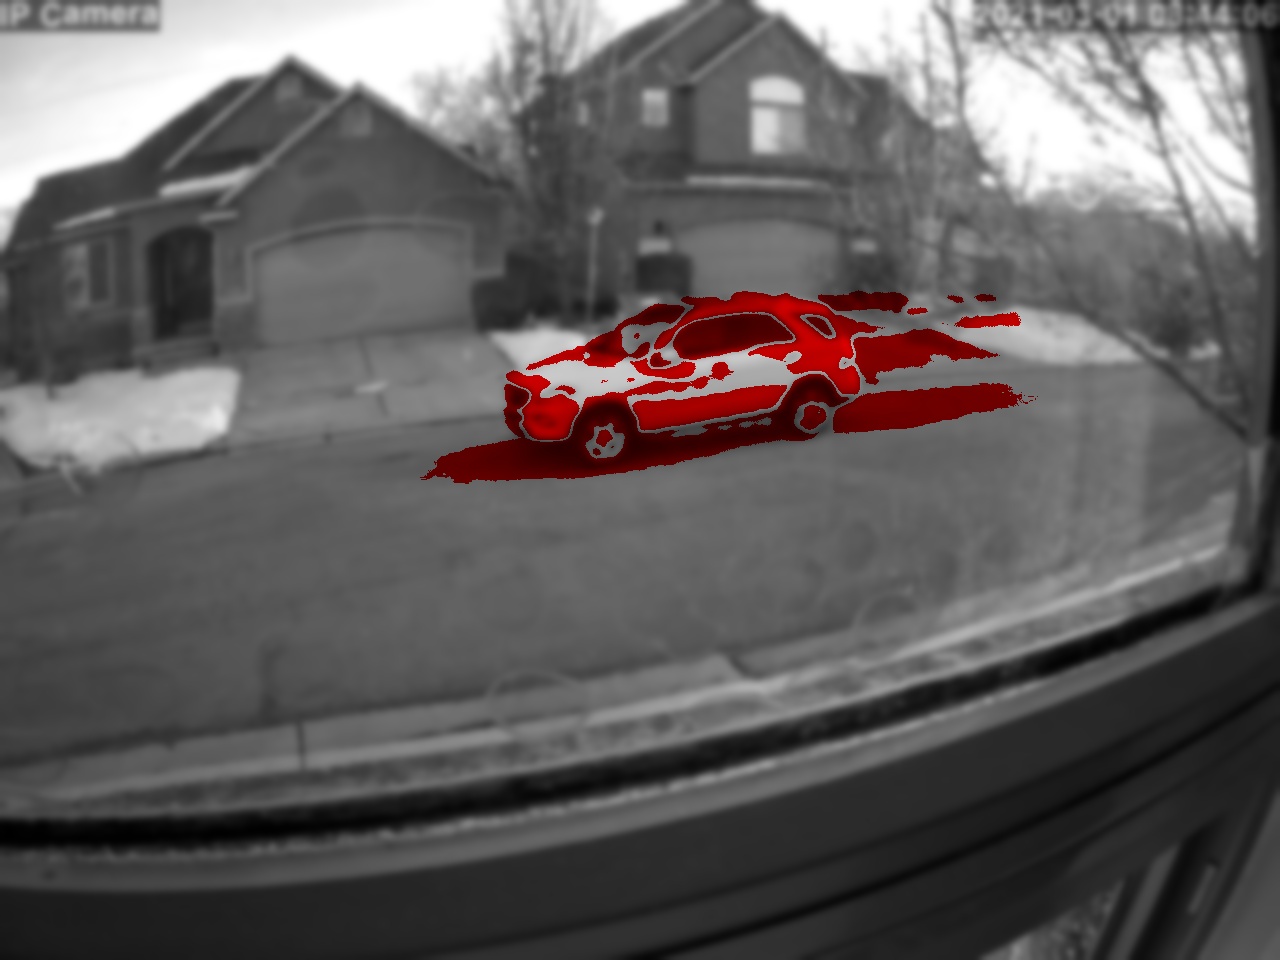
In related fronts, I’ve also included some code that exports frames which are flagged for motion, to better visualize how detection is working. I’ll probably post of few of these as this discussion progresses. It has been an invaluable tool in finding good parameters. I don’t know how this tool will continue forward in an eventual PR, but I’d love to find a way.